The changing of seasons to the much cooler
weather of autumn and now winter can be a bit of a blow, but softened knowing that seasonal produce such as chestnuts will be in abundance. For me it's the season that calls for a drive to the country to take in all its visual beauty. Daylesford, situated north-west of Melbourne is only an hour and a half driving distance away from our home, and has become
one of my favourite little escape destination that can be factored in as a day
trip. This quaint township and its neighbouring Hepburn Springs, is lined with deciduous trees that erupt into
a blaze of colour during the autumn season and with its beautiful
mountain scenery, forests, gardens and lakes, has definitely a magnetic pull. This setting became the perfect day trip and an excuse to stop by at a local orchard to purchase some chestnuts on our way back home.


Although chestnuts are not native to Australia, their introduction to the gold mining areas of Daylesford, Beechworth and the Buckland Valley in Victoria as well as the Blue Mountains in New South Wales dates back to the 1850's with the influx of migrants during the Gold Rush. It's reported that some of the oldest chestnut trees dating back to this period, indicate that miners were most likely to have brought chestnuts with them for consumption on their long journey to Australia and then planting the remaining nuts.
However the development of the chestnut industry in Australia - 100 years later, came about with the new wave of Southern European immigrants mainly from Italy and Greece. Not appreciating the basic 1950's Australian diet and craving the foods of their homelands, these "New Australians" who had moved out into the surrounding farming areas ensured they also had their home garden and orchard supplying fruit, vegetables, wine grapes and of course chestnuts. Later on in the 1970's migrants living in the cities would travel to areas in the country every autumn to get their supply of chestnuts. This in turn encouraged farmers to plant more trees on a commercial basis and so by the 1980's the chestnut industry in Australia had truly begun.
Chestnuts in my family have only ever been eaten roasted over a fire, cooked with aromatics and incorporated in sweets such as the panzerotti di castagne whose recipe is found here. So it has been my aim this season to use this flavoursome nut in some savoury dishes like stuffing for quail and a pasta dish of some sort. Whenever I am lost for ideas on
pairing ingredients I tend to go to my trusted The Cooks Companion by Stephanie Alexander. Here I was able to find a perfect match for chestnuts pairing it with the nutty flavoured porcini mushrooms, and what better way to come together than in a pasta dish creating a filling with these two main ingredients and encasing them as ravioli.
It took several attempts and a little tweaking to ensure the flavours were well
balanced as chestnuts are naturally sweet and the distinctive strong and unique
flavour of the porcini mushrooms needed to be toned down. So I incorporated more of the swiss brown cup variety and less of the porcini mushrooms. You can also use the white button variety. Sage compliments mushrooms and chestnuts perfectly, so the filling also incorporates a small amount of this herb along with some parmesan cheese and an egg for binding.
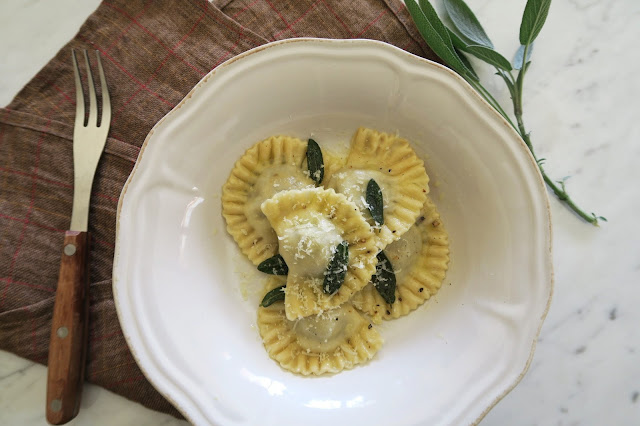
You can shape the ravioli any way you like, but I chose a mezzeluna or half-moon shape the way mamma shapes hers. As a child, it was my assigned task to securely press the edges with a fork to ensure no filling would escape during the cooking process. As these ravioli pack
a punch in flavour, all that is needed is a very simple crispy sage and butter
sauce, an extra grating of parmesan cheese on top and some cracked pepper if desired.
Chestnut & Mushroom Ravioli
Ingredients (makes about 50 ravioli) The quantities for the sauce is for half the ravioli made, while I froze the other 25 uncooked.
For the filling:
- 300 g fresh chestnuts (200 g of peeled, cooked and finely crumbled chestnuts)
- 250 g swiss brown mushrooms (cup variety) finely
chopped
- 10 g of dried porcini mushrooms,
re-hydrated in warm water, drained/squeeze out excess moisture and finely chop
- 1 egg
- 4 medium sized sage leaves finely chopped
- 30 g grated parmesan cheese
- 1 pinch salt
For the pasta:
- 200 g all-purpose flour, plus more for
dusting
- 2 eggs
- 1 pinch salt
To serve:
- 20 small leaves of fresh sage
- 80 g butter
- 40 g grated parmesan cheese
- cracked pepper to taste
Method for the Filling:
Rinse 300 g fresh chestnuts and cut a slash across one side of the shell using a sharp knife. Place chestnuts in a pot full of cold water (enough to fully cover them). Bring to the boil and allow to cook until tender. Duration of time will depend on the size of the chestnut, but approximately 30 minutes. You can check if they are cooked through by inserting a sharp knife into the chestnut like you would through a cooked potato. Drain the chestnuts and allow to cool slightly before peeling both skins with a knife. Finely crumble the cooked chestnuts into a large bowl and set aside.
Finely chop the swiss brown mushrooms and the sage leaves and combine both with the chestnut mixture. Place the porcini mushrooms into a small bowl of warm water and allow them to re-hydrate for 10 minutes. Drain liquid squeezing out as much of the moisture and finely chop the mushrooms. Add the porcini mushrooms to the chestnut mixture. Combine with parmesan cheese, one egg and season with salt to taste. The mixture should be well combined and allowed to rest while the pasta dough is prepared.
Method for the pasta dough:
Place the flour in a large bowl and make a well in the center. Crack 2 eggs in the center of the well and add a pinch of salt. With a fork or your finger tips, begin to whisk the eggs and incorporating the flour little by little. Continue incorporating the flour until all combined and then begin to knead using your hands to bring the dough together until the dough is smooth and elastic. Depending on the size of your eggs, you may need to add more flour if the dough is too sticky or a small amount of water if the dough is too dry. NB: this process can also be done using a food processor. Wrap the dough in plastic and allow it to rest for 30 minutes at room temperature.
The pasta sheets can be made using the pasta machine or rolled out very thinly using a rolling pin. Cut the dough into small pieces and keep covered with plastic wrap so the dough does not dry out while working each piece at a time. Using the pasta machine at the widest setting roll out the pasta. With each passing through of the pasta sheet, fold and dust with flour and reduce the setting, working down to the narrow (second last) setting. The pasta sheets should be smooth and thin enough (about 1 -2 mm) to support the filling. Lay each pasta sheet on a lightly floured board and cover with cloth to stop them from drying out.
Once all the sheets have been rolled out, cut each sheet to approximately 10 cm width to allow for the filling and folding over. Keep the sheets covered while filling one sheet at a time to avoid the sheets from drying out. Place a teaspoon full of mixture on one side of the pasta sheet keeping 1 cm in from the edge and 3 cm apart. Brush some water on the edge of the pasta, then fold the pasta length-ways and seal first on one edge and then cupping your hand around the filling, seal the rest of the edges. Try to push out as much of the air that tends to get trapped inside.
With a crimped pastry cutter or sharp knife cut around the edges forming a half moon shape. To ensure a secure seal use the prong of a fork to press down around the half moon shape ravioli creating a pattern. Any pasta scraps can be passed through to make another sheet, and using up all the mixture to make the last of the ravioli.


Cook the ravioli in a large pot of salted simmering water for about 3 minutes or until they begin to float to the surface. Meanwhile, prepare the sauce by melting the butter gently in a large shallow fry pan together with the small sage leaves. Take care not to burn the sage leaves. Remove the ravioli with a slotted spoon ensuring that all the water is drained and place directly into the pan containing the sauce. Toss through and serve immediately with a grating of parmesan cheese and some cracked pepper if desired.
Enjoy!


Comments
Post a Comment